
How To Repaint A Wall Yourself
Learning how to repaint a wall yourself can be a fulfilling and cost-effective way to rejuvenate your space. This guide takes you through essential steps, from preparation to the final brushstroke, ensuring a professional finish without professional experience.
- What tools do I need to repaint a wall?
- How do I choose the right paint for my wall?
- How long does it typically take to repaint a wall?
- What is the best way to prepare a wall before painting?
- How can I avoid streaks and roller marks?
- Can I paint over wallpaper directly?
- What should I do if bubbles form under the paint?
- How to repaint a wall yourself in Christchurch for best results?
Refreshing the walls of your home can seem like an overwhelming task, especially if you've never attempted it before. However, mastering the art of how to repaint a wall yourself is both rewarding and cost-effective. Reuben Ellis Decorating in Christchurch, New Zealand, offers this comprehensive guide to help you achieve a flawless finish in your next DIY painting project.
Getting Prepared
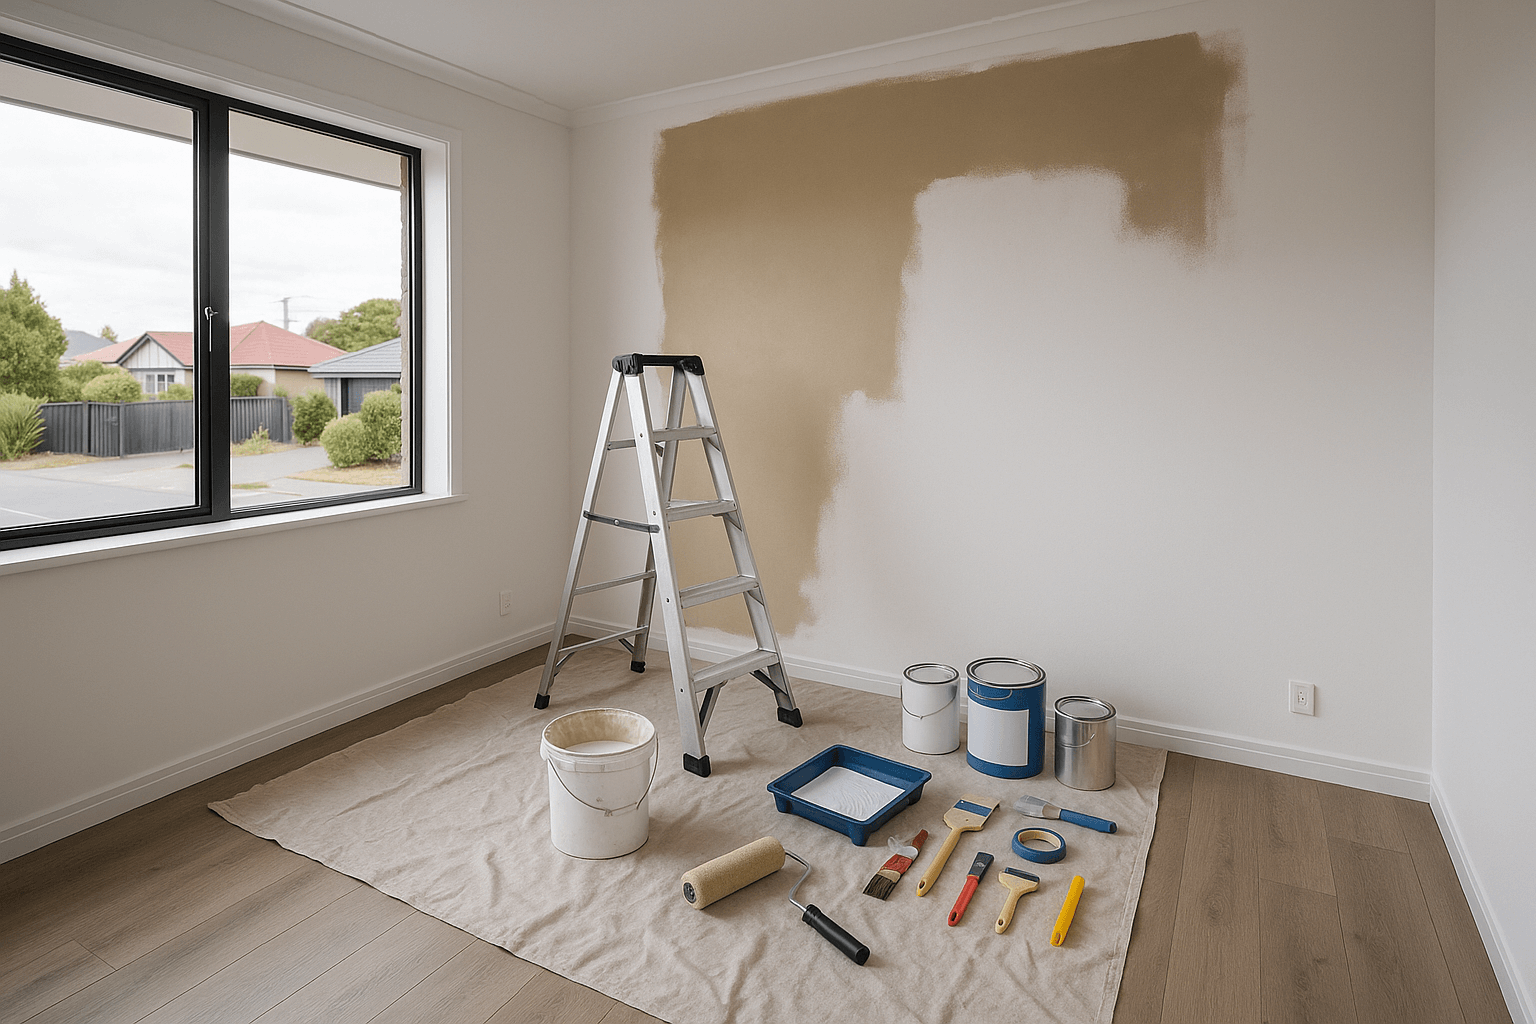
Before you dive in, preparation is crucial. Start by selecting the right paint – consider the room’s purpose and lighting, which can influence colour choices. Make sure you have all necessary tools on hand, such as brushes, rollers, painter's tape, and drop cloths. A well-organised start sets the tone for a successful repainting project.
Choosing the Right Supplies
The quality of your painting tools significantly impacts the end result. Invest in high-quality brushes and rollers; they offer better coverage and finish. Don't forget to choose a paint that aligns with both your aesthetic goals and the practical requirements of your space, whether it's easy-clean for kitchens or mould-resistant for bathrooms.
Prep the Surface
A smooth and well-prepared surface is fundamental to achieving a sleek finish. Begin by filling in any holes or cracks with a suitable filler and sanding the surface to ensure it's even. Clean the wall thoroughly to remove dust and grease, which could affect paint adhesion. By investing time in this stage, you enhance both the appearance and longevity of your paint job.
Step-by-Step Painting Process
Having laid the groundwork in the initial phase, it's time to delve into the art of application. Mastering the craft of painting does not only enhance the aesthetic appeal but also prolongs the life span of the wall surfaces. Now, let's explore the essential steps involved in effectively repainting a wall yourself.
Preparing the Paint
Preparation is the secret to a successful painting project. Start by opening and stirring the paint thoroughly to ensure the pigments are evenly distributed. This is especially critical if the paint has been stored for some time as components can settle, leading to an uneven finish. For optimal adhesion, consider using a paint conditioner if suggested by the manufacturer. A well-mixed paint reduces streaks and encourages a smooth application.
Cutting In Around the Edges
Cutting in refers to the method of painting the edges of walls, the junctions of walls and ceilings, and corners before painting larger areas. Employ an angled brush for this task for better precision. Carefully apply paint along the edges, utilizing a steady hand to maintain straight lines. This step not only ensures comprehensive coverage but also keeps your roller painting neat and methodical by providing a painted border to work from.
Rolling the Walls
Once the edges are efficiently cut, tackle the main wall areas with a roller. Pour the paint into a tray, sufficiently load your roller, and apply it with an even pressure following a 'W' pattern. This technique helps distribute paint evenly, avoiding roller marks and ensuring comprehensive coverage. Remember to overlap your strokes and maintain a wet edge to prevent lap marks. Repeat the process for a professional finish.
Allowing Paint to Dry and Applying a Second Coat
After finishing the first coat, it's vital to allow sufficient drying time as per the paint's specifications. Ensuring proper drying avoids smudging during the second application. Typically, a second coat complements the first and adds depth to the colour. Follow the same technique as the initial coat, including re-cutting at edges. The second layer solidifies the paint's durability and vibrancy, completing the process with a stunning finish.
Following these detailed steps will likely lead to a rewarding DIY painting experience. With patience and precision, you can achieve a professional look in your home or office space at a fraction of the cost, demonstrating that {{business_name}}'s tips from Christchurch have enriched your home environment.
Common Mistakes and How to Avoid Them in DIY Wall Painting
When embarking on the task of painting a wall yourself, mistakes are part and parcel of the learning process. However, avoiding common errors can significantly enhance your results and prevent unnecessary stress. Knowing what to watch out for can save time and improve the quality of your work, aligning perfectly with the interests of DIY enthusiasts seeking a professional finish.
Skipping Surface Preparation
The importance of proper wall preparation cannot be overstated. Poorly prepared surfaces can result in paint that fails to adhere correctly, leading to peeling and uneven textures. It is essential to clean the wall of any dust, grease, and flaking paint. Additionally, filling in cracks and sanding rough spots create a smooth base, ensuring that your fresh coat of paint adheres well and looks flawless. Use a detergent solution for grease removal and a scraper for peeling paint, followed by a primer to ensure a uniform finish.
Incorrect Taping Techniques
One of the most visible mistakes is incorrect taping, which can cause colour bleeding and smudging. Ensuring that painter’s tape is properly placed and sealed against the wall is crucial to defining sharp lines and protecting surfaces that need not be painted. Always use high-quality tape, and apply it with firm pressure to prevent paint from leaking underneath. Remove the tape shortly after painting to avoid pulling off any dried paint, ensuring clean edges.
Improper Application Methods
Improper methods of applying paint, such as overbrushing or using the wrong roller, can lead to streaky finishes and wasted paint. Use a roller for large, flat walls and a brush for cutting in edges and corners. Another common mistake is overloading or underloading the brush or roller with paint. Too much paint can drip and lead to uneven coats, while too little paint will not cover the surface adequately. Dip your brush or roller only about a third of the way into the paint to optimize coverage.
Ignoring Weather Conditions
Weather conditions can play a significant role in the painting outcome. High humidity or cooler temperatures can prolong drying times, leading to unintended smudges or uneven finishes. Always check the weather forecast before starting your painting project. A dry, mild day is ideal for painting, as extreme conditions can hinder the drying process and affect the paint's adhesion.
By being aware of these potential pitfalls and how to avoid them, you can approach your wall painting project with confidence and achieve a professional-looking result. In the next section, we will explore why partnering with experts such as Reuben Ellis Decorating in Christchurch is advantageous to ensure flawless execution.

Why Choose Reuben Ellis Decorating for Professional Wall Painting Services
Repainting walls can transform a space, but achieving a flawless finish often entails professional help. When seeking guidance in Christchurch, New Zealand, Reuben Ellis Decorating stands out as a leading choice for those in need of expert wall painting services in Christchurch. Our team combines local expertise with an unwavering commitment to excellence, making us the trusted name for your painting projects.
Experienced Local Experts
Located in Christchurch, Reuben Ellis Decorating offers unmatched local expertise. We understand the nuances of painting in the Christchurch area, factoring in unique environmental conditions to ensure durable and vibrant results. Our skilled team of professionals brings years of experience, ensuring that every project is executed with precision and care. Whether you're refreshing a single room or undertaking a comprehensive home makeover, our experts are equipped to deliver exceptional results tailored to your vision and preferences.
What Sets Us Apart
At Reuben Ellis Decorating, we differentiate ourselves through a blend of high-quality materials, meticulous attention to detail, and personalised customer service. We source only the best paints and supplies, ensuring that your walls not only look stunning but also withstand the test of time. Our reputation for reliability and professionalism is backed by numerous satisfied clients who consistently commend our work as impeccable and transformative.
Furthermore, we pride ourselves on transparent communication and a client-centric approach, ensuring that you are informed and involved at every step. Our dedication to client satisfaction is not just a promise; it is the foundation of our business. By choosing us, you're opting for peace of mind that your project is in the hands of experts who truly care.
Call 027 777 9543Contact us today for all your wall repainting needs in Christchurch and experience the Reuben Ellis Decorating difference.
In the following section, “Frequently Asked Questions,” we will address common questions about how to repaint a wall yourself to provide further clarity and assurance for your DIY projects.
Frequently Asked Questions
What tools do I need to repaint a wall?
To repaint a wall, you'll need essential tools such as painter's tape, drop cloths, a paint roller, brushes, a roller tray, and a ladder for reaching higher areas. Having these on hand will make the painting process much smoother.
How do I choose the right paint for my wall?
When selecting paint, consider the room's function and lighting. Matt finishes are great for hiding imperfections, whereas glossy finishes offer durability. Also, take into account the paint's base—water-based paints are easier to clean and environmentally friendly.
How long does it typically take to repaint a wall?
The duration depends on the wall size and drying time between coats, but generally, you can expect a single wall project to take a full day. This includes preparation, painting, and cleaning up.
What is the best way to prepare a wall before painting?
Preparing a wall properly involves cleaning the surface, repairing any damages, sanding for smoothness, and applying a primer to ensure the paint adheres correctly. Skimping on preparation can affect the final result.
How can I avoid streaks and roller marks?
To avoid roller marks, use the right roller for your paint type, apply adequate pressure, and maintain a wet edge by overlapping each stroke. This technique ensures a smooth and even coat.
Can I paint over wallpaper directly?
While painting over wallpaper is possible, it's not recommended as this may lead to peeling and uneven textures. It's best to remove the wallpaper first or use a wall smoother to create a paintable surface.
What should I do if bubbles form under the paint?
Bubbles can form due to excessive moisture or painting an unclean surface. If this happens, allow the paint to dry, sand the affected area, clean thoroughly, and apply a fresh coat for a smooth finish.
How to repaint a wall yourself in Christchurch for best results?
In Christchurch, it's crucial to consider the local climate. Begin by choosing a dry, calm day to prevent humidity from impacting the drying time. Ensure all preparatory steps are thorough to achieve professional results.