
How To Apply Masking Tape Before Painting
To effectively use masking tape before painting, start by choosing the right tape, then clean surfaces thoroughly and apply the tape carefully for crisp lines. Following these steps ensures a professional finish.
- What is the purpose of using masking tape when painting?
- Can I use any type of masking tape for painting?
- How can I ensure the masking tape sticks properly?
- When should I remove the masking tape after painting?
- How to apply masking tape before painting on textured surfaces?
- Is it possible to reuse masking tape?
- Does masking tape work on all types of surfaces?
- What are some common mistakes to avoid when applying masking tape?
When tackling a painting project, knowing how to apply masking tape before painting is crucial for achieving a clean and professional finish. At Reuben Ellis Decorating, located in the heart of Christchurch, New Zealand, we understand that the preparatory steps can significantly impact the overall result of your painting efforts. Masking tape is an essential tool in the painter's toolkit, enabling precise lines and protecting surfaces not meant to be painted.
The correct application of masking tape can often be the difference between a seamless result and a messy edge. This versatile tool helps keep your painting jobs efficient and tidily contained. By understanding the key techniques for using masking tape, including selecting the right type and ensuring proper adhesion, you set yourself up for success. Our team at Reuben Ellis Decorating brings this expertise to every project, ensuring customer satisfaction is our top priority.
Understanding Tape Varieties
Choosing the appropriate masking tape involves considering the surface texture and the type of paint you intend to use. There are multiple tape varieties designed for different surfaces and painting circumstances. Whether you're working with rough textures or smooth surfaces, selecting a proper tape ensures adherence without damage.
Preparation and Application
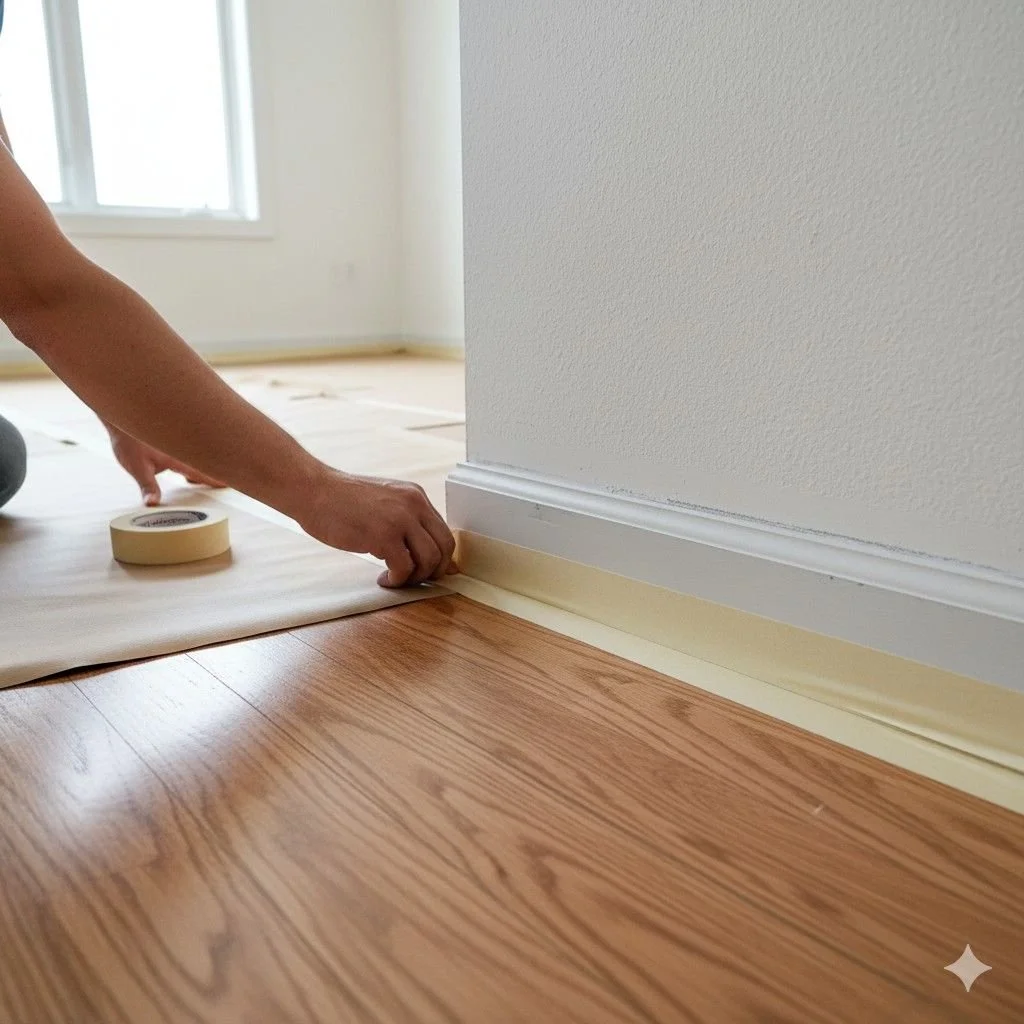
Before laying down the first strip of tape, preparation is key. This involves cleaning the surfaces to be masked thoroughly and ensuring they are dry and free from dust or grease. Applying the tape involves pressing it down firmly along the edges to prevent any paint bleed, which is critical for achieving the sharp lines characteristic of a professional job.
Different Types of Masking Tape
When embarking on a painting project, choosing the right masking tape can significantly impact the final outcome. Masking tapes come in various materials and widths, each suited to different surfaces and paint types. Understanding the distinctions among these types will help ensure your work is precise and professional.
General Purpose
General-purpose masking tape is the most commonly used type, known for its versatility. It is typically made from a thin paper with a moderate adhesive that provides sufficient hold for many indoor surfaces. Whether tackling walls or window frames, this tape is suitable for a variety of generic painting tasks. However, for areas requiring clean lines and a flawless finish, you might need something more specialized.
Painter's Tape
Painters tape is specifically designed for painting projects and provides a sharper edge than general-purpose tape. This variant often comes with features that prevent paint from seeping under the tape, making it ideal for intricate designs and critical lines. Additionally, it is less likely to leave residue after removal, preserving the integrity of surfaces underneath.
Specialty Tapes
In some cases, specialised tapes are needed to address unique challenges, such as high-temperature conditions or texture variations. For instance, heat-resistant tapes are essential for areas exposed to sunlight or heat, while flexible tapes conform to the curves of textured walls or furniture. Selecting a tape geared for specific conditions can be the difference between a subpar and a stellar finish.
The decision-making process doesn't end with just knowing these types. Pairing the right tape with your specific surface and paint will facilitate a seamless project. Now that we've explored the types of masking tape, let's move forward to effectively preparing your workspace to optimise application efficiency and effectiveness.
Preparation for Masking Tape Application
In the previous sections, we delved into the significance of applying masking tape and explored the various types available to cater to different surface requirements. Now, we shift our focus to the essential prep work required for a successful masking tape application before painting. Skipping this crucial step can lead to unsatisfactory results, such as paint bleeding through or tape not adhering securely, thus undermining the entire painting effort.
Cleaning the Surface
The first and perhaps most critical step in applying masking tape is ensuring the surface is impeccably clean. Dust, grease, and moisture can impede tape adhesion, causing it to peel away or allow paint to seep through. Start by using a soft fabric cloth to wipe down the area, followed by a mild detergent solution for stubborn grime. Once cleaned, allow the area to completely dry. This ensures maximum adherence of the tape, improving edge precision during painting.
Measuring and Planning the Coverage Area
Accurate measurement of the area to be masked is key to minimizing tape waste and ensuring precision. Use a measuring tape to determine the lengths required. Also, consider using a pencil to lightly mark tricky spots where edges or intricate work will commence. Prior planning simplifies the process, providing a reference map for applying the tape accurately, thereby enhancing the precision of lines and corners once paint is applied.
Using the Right Tape for the Right Job
With a clean surface and clear planning, the next logical step is selecting the appropriate tape for your specific requirements. Depending on surface texture and paint type, opt for suitable tape as discussed in Section 2. For instance, painter's tape is typically optimal for clean lines on lightly textured surfaces, while specialty tapes may be needed on areas requiring higher precision or unique conditions.
By ensuring a clean surface, precise measurements, and right tape selection, you're setting up a strong foundation for successful painting outcomes. The preparation stage, often overlooked, is integral in achieving professional results.

Why Choose Reuben Ellis Decorating for Masking Tape Application Projects
In the world of painting, precision is key, and no one understands this better than Reuben Ellis Decorating. As experts in Christchurch, New Zealand, they offer a level of local expertise that is unmatched regarding masking tape application—a crucial step in any painting project. This refined skill ensures clean lines and an exceptional finish, making them the preferred choice for both residential and commercial painting needs.
Experienced Local Experts
Reuben Ellis Decorating boasts a team of professionals who are more than just skilled painters; they are specialists in preparing surfaces meticulously and employing the most effective techniques to ensure perfect results. Their deep-rooted presence in Christchurch means they understand the specific climate and architectural styles of the region, enabling them to tailor their services accordingly. Hiring a house painter in Christchurch who understands local conditions is paramount to achieving a flawless painting project.
What Sets Us Apart
Apart from their regional expertise, Reuben Ellis Decorating excels in client satisfaction. They pride themselves on using high-quality materials and the latest industry techniques, ensuring that every job is handled with professionalism and care. Their attention to detail and commitment to excellence have earned them a solid reputation among homeowners and businesses alike, making them a trusted name for masking tape application before painting. Many clients have shared positive testimonials about their prompt service and ability to deliver exactly what was needed without any hassle.
Call 027 777 9543Next, in Section 5 titled, “Frequently Asked Questions,” we will address some of the most common queries related to how to apply masking tape before painting, providing further clarity and support.
Frequently Asked Questions
What is the purpose of using masking tape when painting?
Masking tape is essential for creating clean, crisp edges on your paintwork. It helps prevent paint bleed and ensures a professional finish.
Can I use any type of masking tape for painting?
It's advisable to use painter's tape, which is specifically designed for painting. It provides optimal adhesion and is easy to remove without damaging surfaces.
How can I ensure the masking tape sticks properly?
Make sure to clean the surface thoroughly to remove any dust or grease, and press the tape firmly with your fingers or a tool to ensure full adhesion.
When should I remove the masking tape after painting?
It’s best to remove the tape while the paint is still slightly wet to prevent peeling or cracking. Wait for about 30 to 60 minutes after painting.
How to apply masking tape before painting on textured surfaces?
For textured surfaces, use a higher-quality painter's tape and ensure it is pressed firmly into the texture. You might also need to use a sealer to avoid paint bleed.
Is it possible to reuse masking tape?
Generally, masking tape should not be reused as its adhesive properties diminish after the first use, affecting its performance.
Does masking tape work on all types of surfaces?
Masking tape works on most surfaces, but you should test it in an inconspicuous area first to ensure it doesn't damage delicate surfaces upon removal.
What are some common mistakes to avoid when applying masking tape?
Avoid stretching the tape as you apply it, and ensure that it's applied straight and consistently pressed down to avoid any paint seepage.