
How To Fix Touch Up Paint Mistakes On Walls
To fix touch up paint mistakes on walls, assess the problematic area and prepare your tools carefully. A meticulous approach helps achieve a seamless finish that blends with the existing paintwork.
- Introduction
- Techniques and Tools for Successful Repairs
- Step-by-Step Guide to Simplified Paint Touch Ups
- Why Choose Reuben Ellis Decorating for Professional Painting Solutions
- Frequently Asked Questions
- How can I ensure the touch-up paint matches the existing wall colour?
- What tools do I need for fixing paint touch-up mistakes?
- Why does my touch-up paint look different from the rest of the wall?
- Can I fix touch up paint mistakes on walls myself?
- What if the corrected area is still noticeable?
- How often can I repaint an area before it looks uneven?
- What causes touch-up paint to age differently?
- Is professional painting worth it in Christchurch?
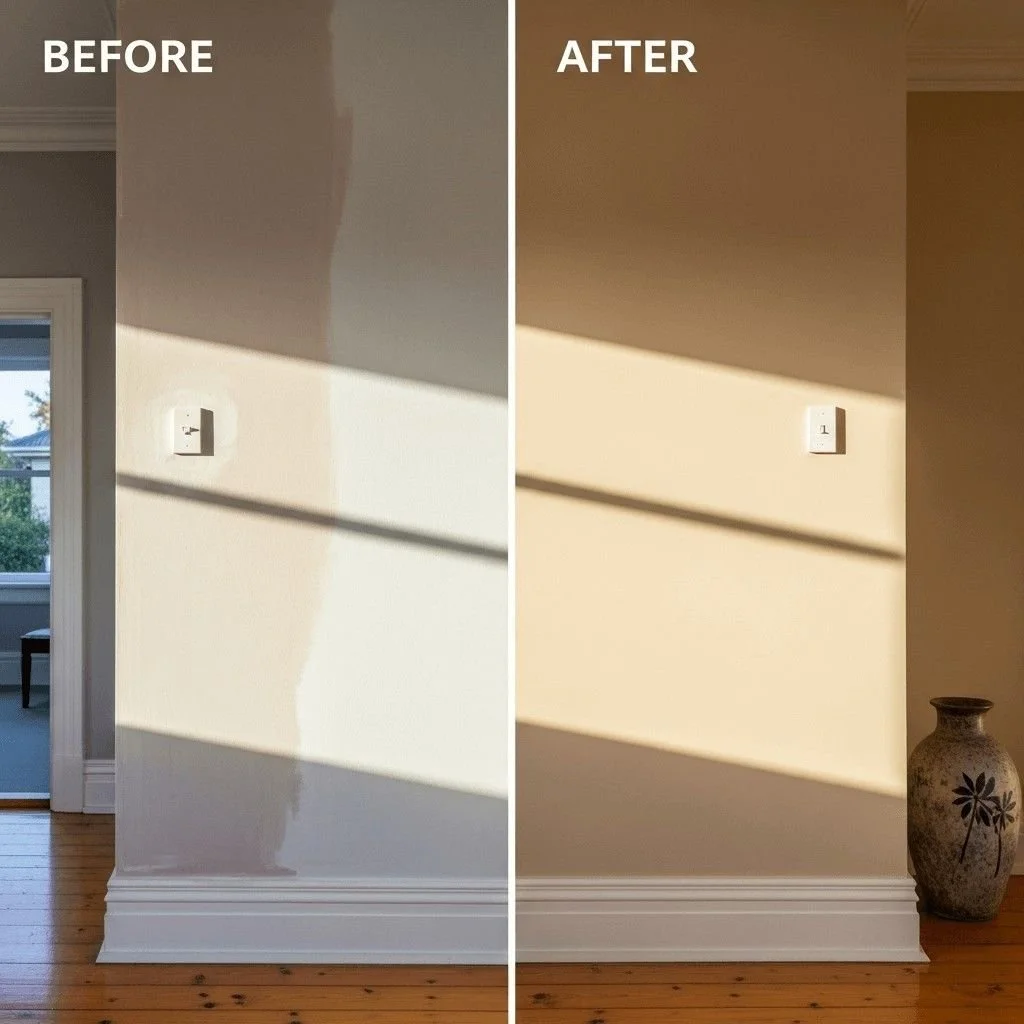
Home improvement projects often leave room for imperfections, and touch up painting is no exception. Recognising the need to fix touch up paint mistakes on walls can be essential for maintaining the aesthetic appeal of your home. Mistakes can range from colour mismatches to poorly blended edges, which, though minor, might impact the overall appearance of an interior space. Addressing these issues is crucial for both homeowners and professionals dedicated to delivering polished results.
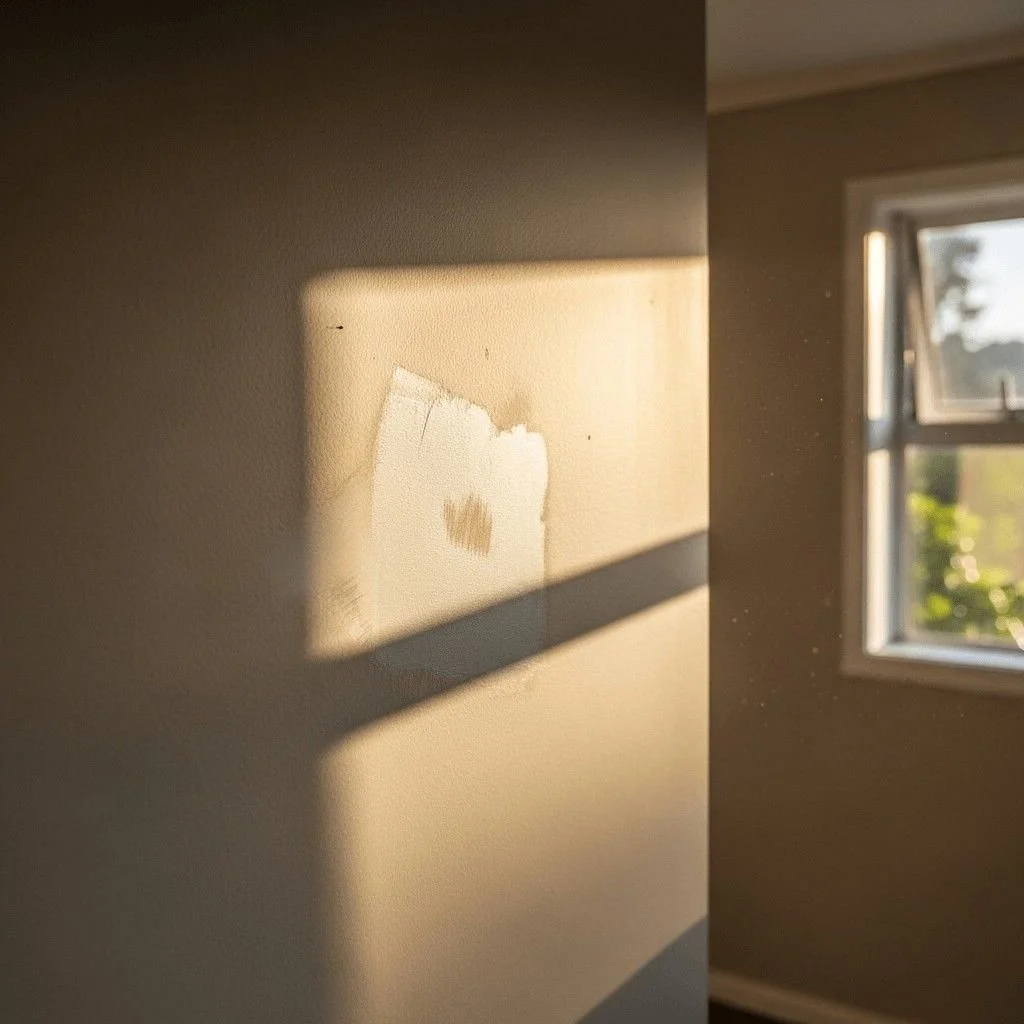
Assessing the Mistake
Before diving into corrective measures, it is important first to assess the extent and nature of the mistake. Are there visible brush strokes, an uneven colour match, or drips that have dried in place? Understanding the specifics allows for a tailored approach when deciding the best method for fixing the touch up paint. This evaluation guides whether a simple reapplication suffices or if the area needs comprehensive preparation and repainting.
Gathering Preparation and Tools
Preparation plays a pivotal role in effectively addressing errors in touch up paint jobs. Ensuring you have the correct tools can significantly impact the quality of the repair. Paint brushes, rollers of the appropriate size, sanding blocks, and matching paint are key components in achieving professional results. For those in Christchurch, New Zealand, enterprises like Reuben Ellis Decorating offer expertise and quality supplies that make tackling these tasks less daunting.
Professional Tips for Achieving a Perfect Finish
While tools and materials set the foundation, employing professional techniques elevates the outcome. Techniques such as feathering the edges to blend seamlessly with the surrounding paint or employing a primer can rectify many surface inconsistencies. Furthermore, conditions like light exposure and wall texture should be considered, as they affect how the paint dries and its final appearance.
For those less experienced or dealing with significant errors, consulting with local experts in Christchurch can provide invaluable assistance. Reuben Ellis Decorating, by offering tailored advice and services, helps ensure that your walls look immaculate, leaving no evidence of past mistakes.
Techniques and Tools for Successful Repairs
Repairing touch up paint mistakes on walls can be challenging, yet with the right techniques and tools, achieving a flawless finish is entirely possible. A systematic approach to corrections ensures not only the aesthetics of your space are maintained but also enhances the longevity of the wall paint. Understanding the materials and methods used by professionals like Reuben Ellis Decorating in Christchurch, you can master the art of blending corrections seamlessly with existing paint.
Choosing the Right Tools
The toolbox of a professional decorator is integral to their success, featuring equipment that ensures precision and durability. Essential tools for correcting touch up paint mistakes include fine-grit sandpaper to gently smooth out blemishes or uneven patches. A high-quality paintbrush or a mini roller is crucial for applying paint layers evenly. Don’t forget to keep a clean, damp cloth handy to quickly wipe away any smudges or drips.
For those dealing with larger areas or more pronounced mistakes, consider employing an airless paint sprayer. This tool enables a smoother finish by applying a uniform layer of paint over the surface. Always ensure your tools are clean and well-maintained, as this prevents old paint residues from interfering with your current work.
Mastering the Techniques
Techniques are as important as the tools used. Begin with thorough preparation—clean the area around the mistake and allow it to dry completely. Using fine-grain sandpaper, carefully sand down the blemish until level with the surrounding area. Dust off any particles before applying paint.
When painting, employ the feathering technique: gradually apply the paint starting from the centre of the blemish working outwards in a light, circular motion. This technique helps in blending the new paint with the old and prevents noticeable edges. To match the existing wall colour accurately, it may be necessary to mix a small batch of paint of differing tints and shades, ensuring the corrected area is indistinguishable from its surroundings.
In cases where paint finishes differ (e.g., gloss vs matte), attention to detail is required. Ensure you’re using the same type and finish of paint as originally applied to avoid texture discrepancies.
Once the repair is made, patience is vital. Allow ample drying time before recoating or making additional adjustments, which helps in gauging the true match and finish of the touched-up area.
Preventing Future Mistakes
While mastering repair techniques is invaluable, preventing mistakes initially can save significant time and resources. Always start with a well-planned approach when painting. Use high-quality paints and brushes, apply thin, even layers, and maintain consistency in your strokes. If unsure, consult a professional painter who can provide guidance and possibly rectify complex errors with expertise.
Importance of Colour Matching
Achieving a seamless touch-up begins with an accurate colour match. Variations in paint batches and fading must be considered. Professionals often use colour matching technology to ensure precision, which can be a valuable investment for personal projects. Alternatively, taking a small sample to a paint supplier for analysis can yield a perfect blend, allowing the touch up to be invisible.
After grasping these tools and techniques, carrying out repairs yourself or with the help of professionals like those at Reuben Ellis Decorating in Christchurch could foster more confidence in maintaining your walls. Repairing touch up paint mistakes flawlessly restores the beauty and harmony of your interiors. Addressing paint mishaps need not be daunting, with practice turning challenges into simple, rewarding tasks.
Now that we have guided you through essential techniques and tools, let's explore step-by-step processes in the following section to simplify paint touch up projects, making them a breeze.
Step-by-Step Guide to Simplified Paint Touch Ups
Kicking off from our deeper dive into techniques and tools, it can sometimes be daunting to put these tips into practice. Fortunately, the task can be made straightforward and manageable with the right approach. Here, we present a step-by-step guide to help you fix touch up paint mistakes on walls, ensuring confidence and precision in your home painting projects.
Preparation and Planning
One of the first things to emphasise when attempting to fix a paint touch-up mistake is thorough preparation. Cleaning the affected area is crucial; dust, dirt, or grease can interfere with your repair process. A simple mixture of mild detergent and water should suffice, followed by a low-residue rinse. Ensuring the surface is dry before proceeding is also paramount.
Selecting the correct paint is another critical element. Ideally, use the same paint used in the original application. If the paint used initially is unavailable, try to match it as closely as possible. Testing on a small, inconspicuous area can help you achieve the best colour match.
Application Techniques
Applying the paint correctly can be as important as the paint itself. For minor touch-ups, small, precise tools like a high-quality brush or a sponge applicator allow for better control and blending. Begin by feathering your application from the centre of the spot outward to seamlessly merge the new paint with the old.
When applying paint, less is often more. A thin layer allows for better control and drying consistency. Allow for adequate drying time before making additional passes, avoiding overly thick layers that might result in uneven texture.
Final Finishing Touches
Once the paint is dry, inspect for any inconsistencies. Light sanding with a fine-grit sandpaper can help erase any remaining visible lines or brush marks, followed by a gentle wipe to remove any dust. This step ensures a smooth, professional finish.
For a uniform sheen, it might be necessary to cover the entire wall with a fresh layer of paint. Although more time-consuming, it guarantees consistency in tone and texture throughout the room.
Understanding these steps not only enhances the final look but bolsters your confidence in handling more ambitious projects. With knowledge and practice, achieving a professional finish is well within reach.
Why Choose Reuben Ellis Decorating for Professional Painting Solutions
When it comes to finding the perfect partner to fix touch up paint mistakes on walls, Reuben Ellis Decorating stands as a beacon of professionalism and reliability. Nestled in the heart of Christchurch, New Zealand, our business brings a deep understanding of both local architectural aesthetics and the varied needs of home and business owners in the region. Our local presence ensures fast, responsive service when you need it most, whether you’re looking to introduce a fresh facelift to your home interior or rectify minor imperfections.
Experienced Local Experts
Reuben Ellis Decorating is not just another painting service—it's a team of skilled professionals with years of expertise in the painting industry. Our intimate knowledge of Christchurch's unique weather conditions and environmental factors allows us to choose the best paints and techniques that work perfectly for your walls. What truly sets us apart is our commitment to using only the highest quality materials, ensuring the durability and beauty of your interiors for years to come. At Reuben Ellis Decorating, every project is executed with meticulous attention to detail by our expert team, making us the go-to choice for expert interior painting in Christchurch.
What Sets Us Apart
What makes choosing Reuben Ellis Decorating a decision you won’t regret is our ethos of absolute client satisfaction and innovative approach. We use advanced techniques and top-of-the-line tools to ensure precision in every stroke and corner of the wall. Moreover, our clients vouch for our transparency and professional approach from project inception to completion. Our reputation for excellence is built upon years of successfully delivering tailored solutions that perfectly reflect each client’s unique style.
To learn more about our services or how we can effectively address your interior painting needs in Christchurch, feel free to reach out. We’re here to ensure your home achieves the flawless, cohesive look you desire.
Call 027 777 9543Stay tuned for our next section, where we will answer the most commonly asked questions about fixing touch up paint mistakes on walls, providing you with the essential information to proceed with confidence.
Frequently Asked Questions
How can I ensure the touch-up paint matches the existing wall colour?
It's essential to use the same paint batch if possible, or match the colour by taking a sample to a paint store for precise mixing. Testing the colour on a small hidden area can also help ensure it blends seamlessly.
What tools do I need for fixing paint touch-up mistakes?
Basic tools like a small brush, paint roller, painter's tape, and fine-grit sandpaper are usually sufficient for correcting minor paint mistakes without hassle.
Why does my touch-up paint look different from the rest of the wall?
Differences in application technique, lighting, and paint sheen can cause noticeable disparities. Ensuring a consistent application method and using the same paint sheen is vital for a uniform finish.
Can I fix touch up paint mistakes on walls myself?
Yes, with the right tools and techniques, most homeowners can handle touch-up paint corrections. However, for extensive repairs or high walls, professional help might be beneficial.
What if the corrected area is still noticeable?
If the fix is still apparent, try feathering the edges or applying a second coat of paint, ensuring that the finish is even and matches the texture of the wall.
How often can I repaint an area before it looks uneven?
Repainting too frequently can lead to a patchy appearance. It's best to allow the paint to dry completely and assess the coverage before reapplying.
What causes touch-up paint to age differently?
Factors like sunlight exposure, humidity, and room usage can affect paint wear. Over time, even the same paint can appear different as it ages, particularly if partial repaints are done under varying conditions.
Is professional painting worth it in Christchurch?
In Christchurch, hiring a professional ensures high-quality results, especially for complex or large-scale projects. Professionals bring precision and expertise, reducing the risk of noticeable mistakes.